|
|
|
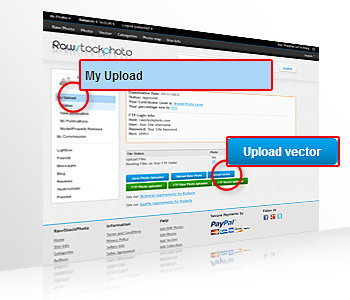
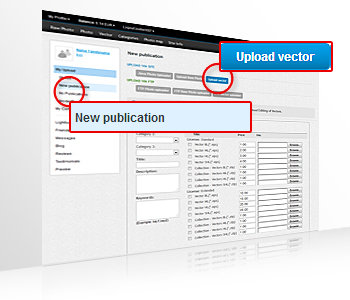
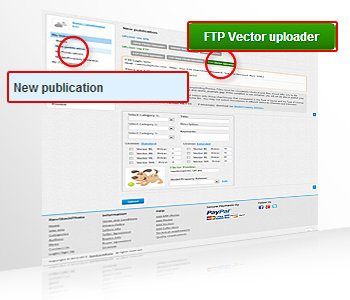
Go to section "My Upload”, and click the blue button "Upload Vector". The site will automatically switch you to the section "New publication", "Upload Vector".
|
|
Step 1
|
|
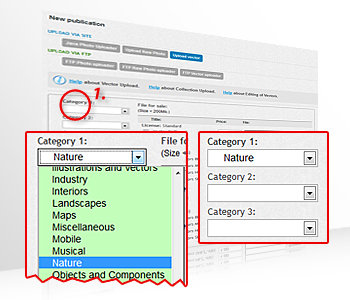
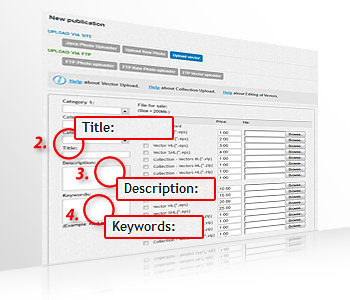
Before you begin the process to upload your Vector file:
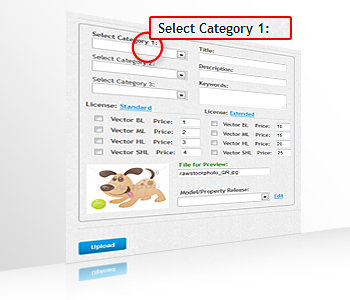
1. You can choose between three product categories in which to present your Vector file, you must _select_ at least one of them.
|
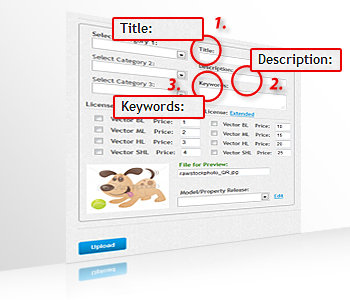
2. You must enter a title for your Vector file in the field "Title".
3. You must enter a description to your Vector file in the field "Description".
4. You must enter keywords for your Vector file in the field "Keywords".
You can find the requirements for entering information into these fields here.
|
|
|
| |
Before you upload a Vector file, You can add "Title", "Description" and "Keywords" to the file for your Vector Preview via your preferred software.
When this metadata is added to the file for your Vector Preview uploading it in Step 3, our system will automatically identify it in the process of uploading. Thus you may not fill out the fields 2,3 and 4! Our Site use IPTC standard for metadata in files. |
|
|
Step 2
|
|
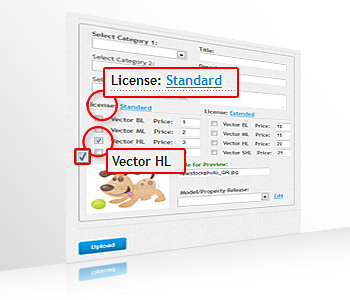
In the "File for sale" you must _select_ only those checkboxes that correspond to the Type of Vector and the Type of License under which you wish to sell your Vector file. Details about the Types of Vectors see here.
By default, all checkboxes are turned off.
|
|
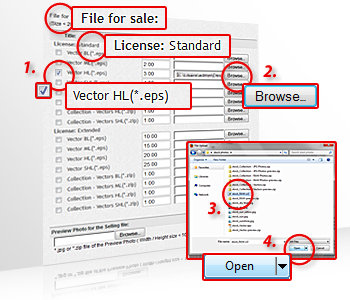
Example 1
If you want to upload Vector of type HL (High Level) and sell it only in Standard License, you must:
|
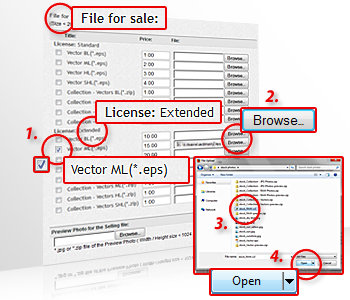
Example 2
If you want to upload Vector of type ML (Middle Level) and sell it only in the Extended License, you must:
|
|
1. _select_ the checkbox "Vector HL" in the table "License: Standard";
2. click "Browse" to locate your Vector HL file
3. _select_ the file from the list on your computer;
4. click on "Add" to add your Vector HL file.
Your Vector HL file appears on the right side of the field.
|
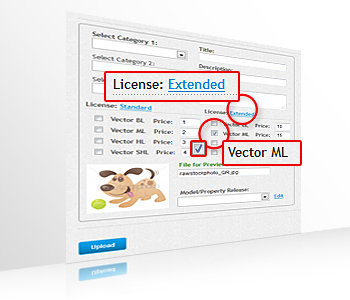
1. _select_ checkbox "Vector ML" in the table "License: Extended";
2. click "Browse" to locate the file with your Vector ML;
3. _select_ the file from the list on your computer;
4. click on "Add" to add your Vector ML file.
Your Vector ML file appears on the right side of the field.
|
|
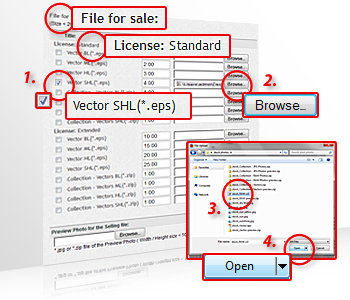
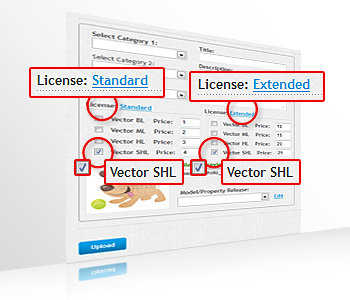
Example 3
If you want to upload Vector of type SHL (Super High Level) and sell it under both our licenses (Standard License and Extended License), you must:
|
|
1. _select_ the checkbox "Vector SHL" in the table "License: Standard";
2. click "Browse" to locate your Vector SHL file;
3. _select_ the file from the list on your computer;
4. click on "Add" to add your Vector SHL file.
Your Vector SHL appears on the right side of the field
|
5. _select_ the checkbox "Vector SHL" in the table " License: Extended";
6. click "Browse" to locate your Vector SHL file;
7. _select_ from the list on your computer the same file that you _select_ed for the table "License: Standard" in p.3 of this example;
8. click on "Add" to add your Vector SHL file.
Your Vector SHL appears on the right side of the field.
|
| |
Important!
When You upload a Vector file for sale in both our licenses - Standard and Extended:
• checkboxes that you _select_ must be the same in the tables for both licenses and must comply exactly with the Type of Vector which You will upload!
• the file that you _select_ from your computer must be the same in both tables for the both licenses!
You may not upload at the same time Vector file of one type (eg. SHL) for the Standard License, and another type (eg. VL) for Extended License, in the same marked checkboxes in tables!
You may not upload the same Vector file for Standard License and Extended License in various checkboxes marked in the tables!
Please be very careful when choosing your Vector file.
|
|
|
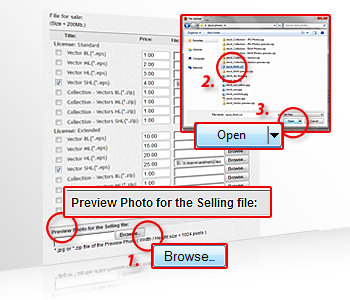
1. In the field "Preview Photo for the Selling file:" You must _select_ the file to preview your Vector. Click "Browse" to locate your file for preview.
2. Select the file from the list on your computer.
3. Click "Add" to add your file for preview.
Your file for preview appears on the right side of the field.
|
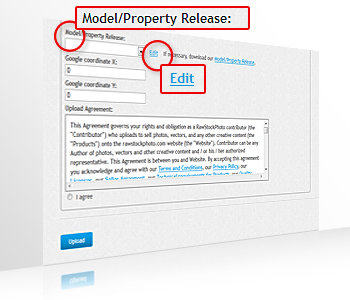
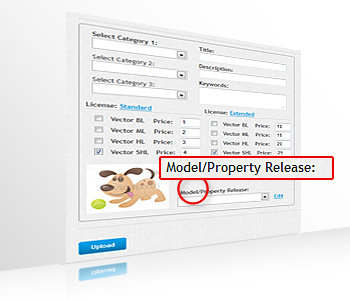
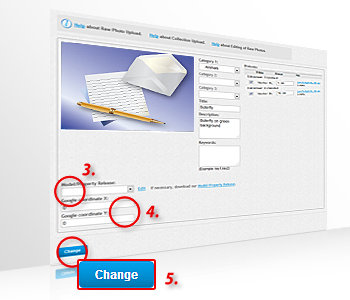
If your Vector file requires Model or Property Release, in the _drop_down menu "Model/Property Release" You must _select_ the file of the Release, that you have previously uploaded from the Section "My Upload", "Model/Property Release". If You do not have uploaded Model or Property Release in advance, you can do this by clicking "Edit" on the field "Model/Property Release". See how here.
|
|
|
Technical requirements to the Vector file and the file for preview can be found here. You can find Quality requirements for your Vector files here.
|
|
Step 5
|
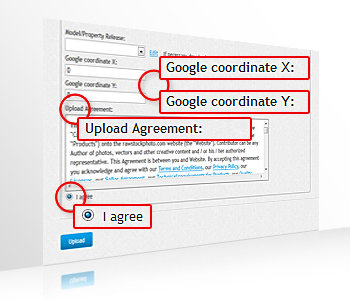 |
You can add Google coordinate (optional).
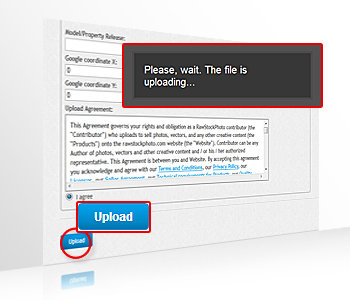
Before you complete the upload of your Vector file, carefully read our Upload Agreement", and if you agree with its contents, _select_ radio button "I agree".
|
|
|
Step 6
|
|
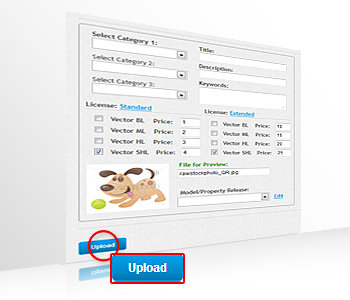
To complete the process of the upload of your Vector file, click "Upload". Wait for the time needed to upload your Vector file. The time of Uploading depends on the speed provided by your Internet service provider.
|
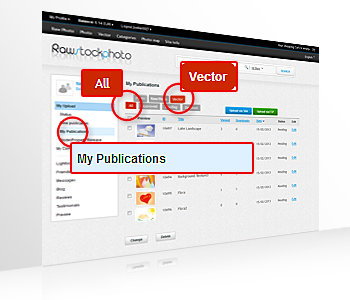
Once the upload process is complete, your site will automatically transfer you to the section "My publication", "Vector", where you can see your Vector file in table "All".
|
|
|
| |
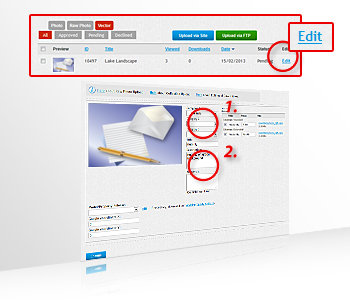
In "My publication" section, "Vector", table "All" You can:
• view the status of your Vector file. See our Seller Agreement, regarding the status of the your Vector file;
• get statistical information about your Vector file (ID, Title, Viewed, Downloads, Date);
• edit the information for your Vector file - See how here;
• _delete_ your Vector file.
|
|
|
Repeat these steps for each Vector file which you want to upload.
|
|
|
|
Upload via FTP is performed in two stages:
1. Upload files via FTP;
2. Post files to the Website.
|
|
The information that you need to log in to your FTP account is described in Section "My Upload" on the Site. Use Your favorite FTP program to upload (FTP client).
Prepare Your Vector files to upload and generate corresponding files for Preview of each file according to our Technical requirements for Vectors.
| |
Important!
Names of Vector Files and their corresponding Preview Files must be completely identical (pair files should differ only by file extension - eg.: vector_example.eps and vector_example.jpg).
If this condition is not complied, you will not be able to publish your files.
Your FTP folder where should upload Vector Files and corresponding files for Preview is: /vector
Select Vector Files and their corresponding Files for Preview from your computer and upload them via FTP client.
The limit of your FTP account is 1000 files.
After you finish uploading, your files for Publication are located in FTP folder: /vector.
|
|
|
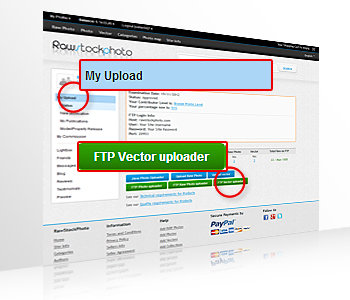
Go to the Website, section "My Upload”, and click the green button "FTP Vector uploader". The site will automatically switch you to the section "New publication", "FTP Vector uploader".
Before you begin the process of uploading your Vector files, carefully read our Upload Agreement.
|
|
The Process of publishing your files takes a few steps:
|
|
You must _select_ at least one of the three Product Categories for your Vector file.
|
1. You must enter a title for your Vector file in the field "Title".
2. You must enter a description to your Vector file in the field "Description".
3. You must enter keywords for your Vector file in the field "Keywords".
You can find the requirements for entering information into these fields here.
|
|
|
| |
Before you upload a Vector file, You can add "Title", "Description" and "Keywords" to the file for your Vector Preview via your preferred software. When this metadata is added to the file for your Vector Preview our system will automatically identify it. Thus you may not fill out the above three fields! Our Site use IPTC standard for metadata in files. |
|
|
Step 3
|
|
In the field "License - Price" you must _select_ only those checkboxes that correspond to the Type of Vector and the Type of License under which you wish to sell your Vector file. Details about the Types of Vectors see here.
By default, all checkboxes are turned off.
|
|
If you want to upload Vector of type HL (High Level) and sell it only in Standard License, you must _select_ the checkbox "Vector HL" in the table "License: Standard";
|
If you want to upload Vector of type ML (Middle Level) and sell it only in the Extended License, you must _select_ checkbox "Vector ML" in the table "License: Extended";
|
 |
If you want to upload Vector of type SHL (Super High Level) and sell it under both our licenses (Standard License and Extended License), you must _select_ the checkbox "Vector SHL" in the table "License: Standard" and the checkbox "Vector SHL" in the table " License: Extended";
|
| |
Important!
When You upload a Vector file for sale in both our licenses - Standard and Extended, checkboxes that you _select_ must be the same in the tables for both licenses and must comply exactly with the Type of Vector which You will upload!
You may not _select_ checkboxes in different tables for Standard and Extended Licence for same vector file!
|
|
|
You can change the Model or Property Release from the _drop_down menu "Model/Property Release".
Do this for each uploaded Vector File!
|
To complete the process of Publishing your _select_ed Vector Files, and before go to the next page with files (if any), click the "Upload".
|
|
|
| |
If your Vector file requires Model or Property Release, in the _drop_down menu "Model/Property Release" You must _select_ the file of the Release, that you have previously uploaded from the Section "My Upload", "Model/Property Release". If You do not have uploaded Model or Property Release in advance, you can do this by clicking "Edit" on the field "Model/Property Release". See how here. |
|
3. EDIT THE UPLOADED VECTORS
|
|
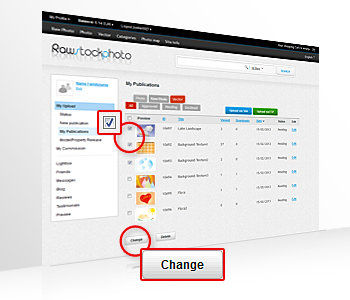
After completing the process of upload and site automatically take you to section "My publication", "Vector", table "All", You have two options to edit your Vector files:
1. Editing a single file
2. Edit multiple files
|
|
1. Editing a single file
|
|
Go to the "Edit" field of your Vector uploaded files. Here:
1. You can edit the information for _select_ion of Product Categories;
2. You can edit the information for "Title", "Description" and "Keywords";
You can find the requirements for entering information into these fields here.
|
3. You can edit the information in the table "Prices".
4. You can change the Model or Property Release from the _drop_down menu "Model/Property Release".
5. You can add Google coordinate (optional).
6. To complete the editing of your Vector file press "Change" button.
|
|
|
| |
Important!
• If you decide to edit your License type in the table "Prices" when it_qt_s done Uploading process, keep in mind that this does not add a new License. You can only turn off one of the checkboxes (if you have uploaded your file for sale in both licenses), and subsequent editing will not be able to mark them again.
The solution for this is to _delete_ the file and then re-upload it by your desired choice.
Carefully make your choice in what Type of License you wish to sell your Vector files.
We recommend you sell your Vector s in all sizes and in both our licenses. Details about resolution, licenses and prices You can find here.
|
| |
If your Vector file requires Model or Property Release, in the _drop_down menu "Model/Property Release" You must _select_ the file of the Release, that you have previously uploaded from the Section "My Upload", "Model/Property Release". If You do not have uploaded Model or Property Release in advance, you can do this by clicking "Edit" on the field "Model/Property Release". See how here. |
|
|
2. Edit multiple files
|
|
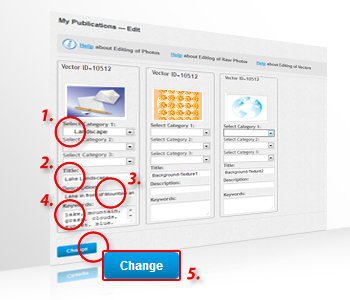
In the table "All" _select_ these checkboxes of your Vector files that you want to edit. At the bottom of the table, press "Change" button. The site will switch you to the section for editing multiple files. Here:
1. You must _select_ at least one of the three Product Categories for your Vector file.
2. You must enter a title for your Vector file in the field "Title".
|
3. You must enter a description to your Vector file in the field "Description".
4. You must enter keywords for your Vector file in the field "Keywords".
You can find the requirements for entering information into these fields here.
5. After you complete the editing your _select_ed Vector files press "Change" button.
|
|
|
| |
Before you upload a Vector file, You can add "Title", "Description" and "Keywords" to the Preview file for your Vector file via your preferred software. When this metadata is added to the Preview file for your Vector file our system will automatically identify it. Thus you may not fill out the above three fields! Our Site use IPTC standard for metadata in files. |
|
 English
 Bulgarian
 German
 Russian
 Spanish