1. КÐЧВÐÐЕ ЧРЕЗ СÐЙТÐ
|
|
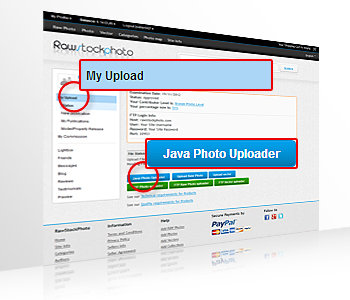
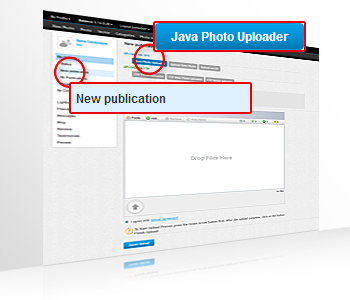
Идете в ÑÐµÐºÑ†Ð¸Ñ "Моите Качени” и натиÑнете ÑÐ¸Ð½Ð¸Ñ Ð±ÑƒÑ‚Ð¾Ð½ "Качи Ð˜Ð·Ð¾Ð±Ñ€Ð°Ð¶ÐµÐ½Ð¸Ñ Ñ‡Ñ€ÐµÐ· Java". Сайтът автоматично ще Ви прехвърли в ÑекциÑта "Ðова публикациÑ", "Качи Ð˜Ð·Ð¾Ð±Ñ€Ð°Ð¶ÐµÐ½Ð¸Ñ Ñ‡Ñ€ÐµÐ· Java".
Преди да започнете процеÑа на качване на Вашите файлове Ñ Ð˜Ð·Ð¾Ð±Ñ€Ð°Ð¶ÐµÐ½Ð¸Ñ, внимателно Ñе запознайте ÑÑŠÑ Ñъдържанието на нашето Споразумение за Качване.
|
|
Стъпка 1
|
 |
 |
|
Вариант 1
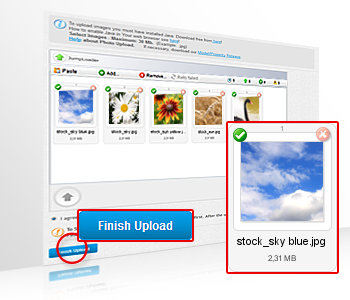
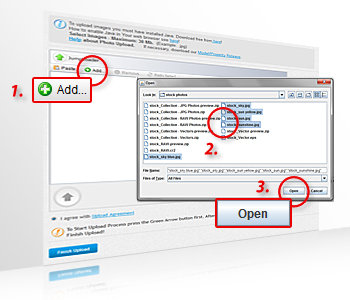
1. ÐатиÑнете бутона "Add" за да Ви Ñе отвори прозореца за избор на файл, където може да намерите ВашиÑÑ‚ файл Ñ Ð˜Ð·Ð¾Ð±Ñ€Ð°Ð¶ÐµÐ½Ð¸Ðµ за качване.
2. Изберете файла от ÑпиÑъка в компютъра Ви. Ðко Ñте решили да качвате повече от един файл, можете да маркирате едновременно вÑички файлове за качване чрез натиÑкане и задържане на бутона "Shift" от Вашата клавиатура.
3. Кликнете върху "Open" за да добавите ВашиÑÑ‚/те файл/ове за качване.
ВашиÑÑ‚/те файл/ове Ñ Ð˜Ð·Ð¾Ð±Ñ€Ð°Ð¶ÐµÐ½Ð¸Ðµ/Ñ Ñе поÑвÑват в прозореза за качване.
|
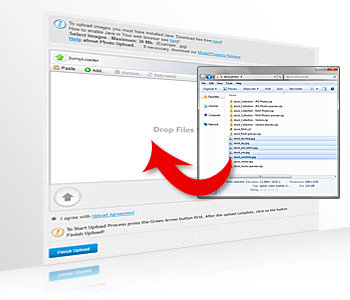
Вариант 2
Ðамерете ВашиÑÑ‚/те файл/ове Ñ Ð˜Ð·Ð¾Ð±Ñ€Ð°Ð¶ÐµÐ½Ð¸Ðµ/Ñ Ð² папката от компютъра Ви. Маркирайте файла/овете които ще качвате и проÑто ги завлечете в прозореза за качване.
ВашиÑÑ‚/те файл/ове Ñ Ð˜Ð·Ð¾Ð±Ñ€Ð°Ð¶ÐµÐ½Ð¸Ðµ/Ñ Ñе поÑвÑват в прозореза за качване.
|
|
|
ТехничеÑките изиÑÐºÐ²Ð°Ð½Ð¸Ñ ÐºÑŠÐ¼ Файловете може да намерите тук. ИзиÑкваниÑта към КачеÑтвото за Ð˜Ð·Ð¾Ð±Ñ€Ð°Ð¶ÐµÐ½Ð¸Ñ Ð¼Ð¾Ð¶Ðµ да намерите тук.
|
|
Стъпка 2
|
|
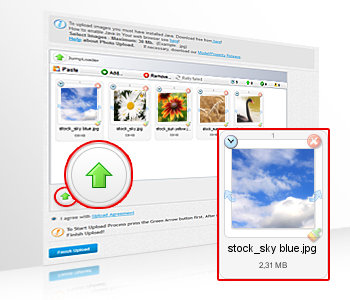
За да продължите процеÑа на качване на ВашиÑÑ‚/те файл/ове Ñ Ð˜Ð·Ð¾Ð±Ñ€Ð°Ð¶ÐµÐ½Ð¸Ðµ/Ñ, натиÑнете бутона "Зелена Ñтрелка".
|
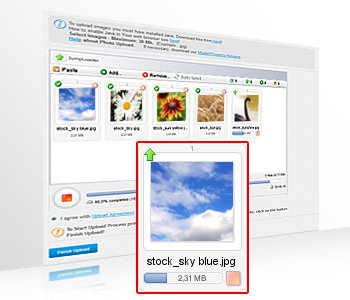
Изчакайте нужното време за да Ñе качи/ат ВашиÑÑ‚/те файл/ове Ñ Ð˜Ð·Ð¾Ð±Ñ€Ð°Ð¶ÐµÐ½Ð¸Ðµ/Ñ. Времето за качване изцÑло завиÑи от ÑкороÑтта, коÑто ползвате от Ð’Ð°ÑˆÐ¸Ñ Ð˜Ð½Ñ‚ÐµÑ€Ð½ÐµÑ‚ доÑтавчик.
|
|
|
Стъпка 3
|
|
За да завършите процеÑа на качване на ВашиÑÑ‚/те файл/ове Ñ Ð˜Ð·Ð¾Ð±Ñ€Ð°Ð¶ÐµÐ½Ð¸Ðµ/Ñ, натиÑнете бутона "Завърши Качването".
|
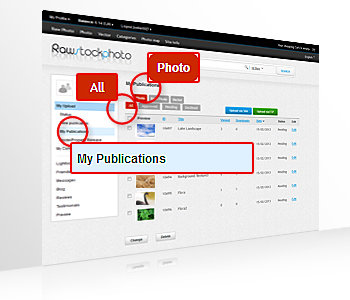
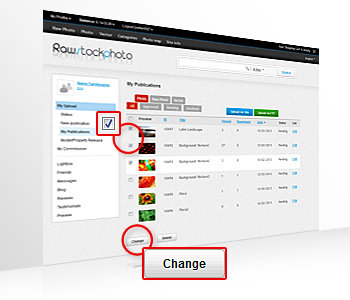
Сайтът автоматично ще Ви прехвърли в ÑекциÑта "Моите Публикации", "Изображение", където в таблицата "Ð’Ñички" може да видите качениÑ/те от Ð’Ð°Ñ Ñ„Ð°Ð¹Ð»/ове Ñ Ð˜Ð·Ð¾Ð±Ñ€Ð°Ð¶ÐµÐ½Ð¸Ðµ/Ñ.
|
|
|
| |
Ð’ ÑекциÑта "Моите Публикации", "Изображение", таблица "Ð’Ñички Вие можете
• да проÑледите ÑтатуÑа на ВашиÑÑ‚/те файл/ове Ñ Ð˜Ð·Ð¾Ð±Ñ€Ð°Ð¶ÐµÐ½Ð¸Ðµ/Ñ. Запознайте Ñ Ð½Ð°ÑˆÐµÑ‚Ð¾ Споразумение Ñ ÐŸÑ€Ð¾Ð´Ð°Ð²Ð°Ñ‡Ð°, отноÑно ÑтатуÑа на ВашиÑÑ‚/те файл/ове Ñ Ð˜Ð·Ð¾Ð±Ñ€Ð°Ð¶ÐµÐ½Ð¸Ðµ/Ñ;
• да получите ÑтатиÑтичеÑка Ð¸Ð½Ñ„Ð¾Ñ€Ð¼Ð°Ñ†Ð¸Ñ Ð·Ð° ВашиÑÑ‚/те файл/ове Ñ Ð˜Ð·Ð¾Ð±Ñ€Ð°Ð¶ÐµÐ½Ð¸Ðµ/Ñ (ID, Заглавие, ВидÑно, Изтеглени, Дата);
• да редактирате информациÑта за ВашиÑÑ‚/те файл/ове Ñ Ð˜Ð·Ð¾Ð±Ñ€Ð°Ð¶ÐµÐ½Ð¸Ðµ/Ñ - Вижте как тук;
• да изтриете ВашиÑÑ‚/те файл/ове Ñ Ð˜Ð·Ð¾Ð±Ñ€Ð°Ð¶ÐµÐ½Ð¸Ðµ/Ñ.
|
|
2. КÐЧВÐÐЕ ЧРЕЗ FTP
|
|
Качването чрез FTP протича в два етапа:
1. Качване на файлове през FTP;
2. Публикуване на файлове в Сайта.
|
|
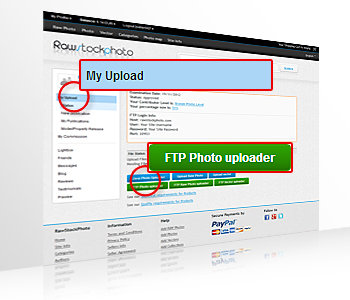
ИнформациÑта, коÑто Ви е нужна за да влезете във Ð’Ð°ÑˆÐ¸Ñ FTP Ðкаунт е опиÑана в ÑекциÑта "Моите Качени" в Сайта. Използвайте Вашата любима програма за FTP качване (FTP клиент).
Подгответе файловете Ñ Ð˜Ð·Ð¾Ð±Ñ€Ð°Ð¶ÐµÐ½Ð¸Ñ, които ще качвате, Ñпоред нашите ТехничеÑки изиÑÐºÐ²Ð°Ð½Ð¸Ñ ÐºÑŠÐ¼ ИзображениÑта.
| |
Вашата FTP папка в коÑто Ñ‚Ñ€Ñбва да качите файловете Ñ Ð˜Ð·Ð¾Ð±Ñ€Ð°Ð¶ÐµÐ½Ð¸Ñ Ðµ: /photo
Изберете файловете Ñ Ð˜Ð·Ð¾Ð±Ñ€Ð°Ð¶ÐµÐ½Ð¸Ñ Ð¾Ñ‚ Ð’Ð°ÑˆÐ¸Ñ ÐºÐ¾Ð¼Ð¿ÑŽÑ‚ÑŠÑ€ и ги качете чрез FTP клиента.
Лимита на Ð’Ð°ÑˆÐ¸Ñ FTP акаунт е 1000 файла.
След като приключите Ñ ÐºÐ°Ñ‡Ð²Ð°Ð½ÐµÑ‚Ð¾, Вашите файлове за Публикуване Ñе намират в FTP папка: /photo.
|
|
|
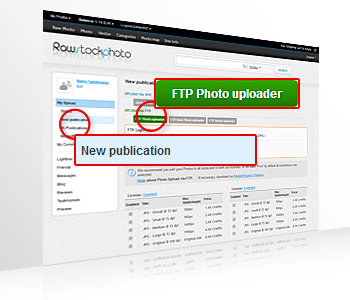
Идете в Сайта, ÑÐµÐºÑ†Ð¸Ñ "Моите Качени” и натиÑнете Ð·ÐµÐ»ÐµÐ½Ð¸Ñ Ð±ÑƒÑ‚Ð¾Ð½ "Качи Ð˜Ð·Ð¾Ð±Ñ€Ð°Ð¶ÐµÐ½Ð¸Ñ Ð¾Ñ‚ FTP". Сайтът автоматично ще Ви прехвърли в ÑекциÑта "Ðова публикациÑ", "Качи Ð˜Ð·Ð¾Ð±Ñ€Ð°Ð¶ÐµÐ½Ð¸Ñ Ð¾Ñ‚ FTP".
Преди да започнете процеÑа на Публикуване на Вашите файлове Ñ Ð˜Ð·Ð¾Ð±Ñ€Ð°Ð¶ÐµÐ½Ð¸Ñ, внимателно Ñе запознайте ÑÑŠÑ Ñъдържанието на нашето Споразумение за Качване.
|
|
ПроцеÑÑŠÑ‚ на Публикуване на файловете Ви в Сайта протича в нÑколко Ñтъпки:
|
|
Стъпка 1
|
Стъпка 2
|
 |
 |
|
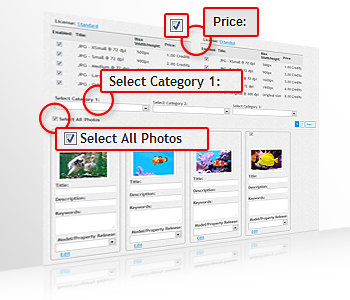
Препоръчваме Ви да продавате Вашите Ð˜Ð·Ð¾Ð±Ñ€Ð°Ð¶ÐµÐ½Ð¸Ñ Ð²ÑŠÐ² вÑички размери и в двата ни лиценза. Затова в таблицата за "Цена" по подразбиране вÑички чекбокÑове Ñа маркирани. ПодробноÑти отноÑно резолюциÑта, лицензите и цените вижте тук.
Задължително Ñ‚Ñ€Ñбва да изберете поне една от трите Продуктови Категории за Вашите файлове Ñ Ð˜Ð·Ð¾Ð±Ñ€Ð°Ð¶ÐµÐ½Ð¸Ñ.
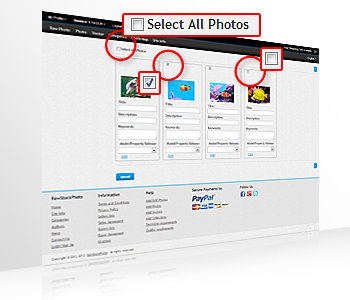
• Ðко вÑички качени файлове ÑъответÑтват на избраните от Ð’Ð°Ñ ÐŸÑ€Ð¾Ð´ÑƒÐºÑ‚Ð¾Ð²Ð¸ Категории, препоръчваме да оÑтавите включен чекбокÑа "Избери вÑички ИзображениÑ".
|
• Ðко имате качени файлове които не ÑъответÑтват на избраните от Ð’Ð°Ñ ÐŸÑ€Ð¾Ð´ÑƒÐºÑ‚Ð¾Ð²Ð¸ Категории, Ñ‚Ñ€Ñбва да изключите чекбокÑа "Избери вÑички ИзображениÑ", и да включите индивидуално чекбокÑа за вÑеки файл, който ÑъответÑтва на избраните от Ð²Ð°Ñ Ð’Ð°Ñ ÐŸÑ€Ð¾Ð´ÑƒÐºÑ‚Ð¾Ð²Ð¸ Категории.
Ðаправете това за вÑеки качен файл, ÑъответÑтващ на дадената Продуктова КатегориÑ.
|
|
|
Стъпка 3
|
Стъпка 4
|
 |
 |
|
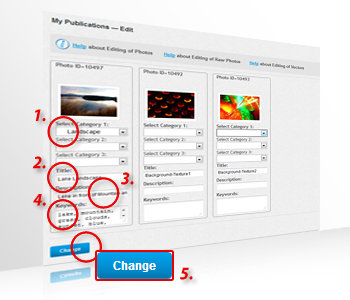
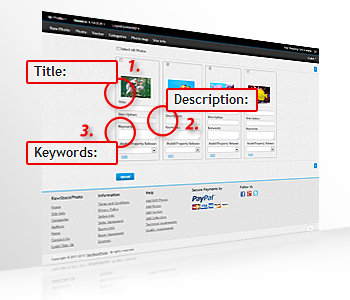
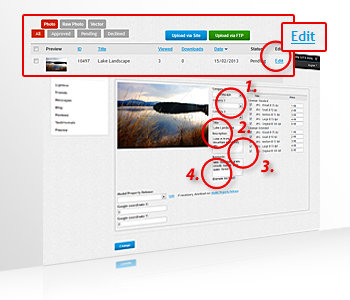
1. Задължително Ñ‚Ñ€Ñбва да въведете име на ВашиÑÑ‚ файл Ñ Ð˜Ð·Ð¾Ð±Ñ€Ð°Ð¶ÐµÐ½Ð¸e в полето "Заглавие".
2. Задължително Ñ‚Ñ€Ñбва да въведете опиÑание на ВашиÑÑ‚ файл Ñ Ð˜Ð·Ð¾Ð±Ñ€Ð°Ð¶ÐµÐ½Ð¸e в полето "ОпиÑание".
3. Задължително Ñ‚Ñ€Ñбва да въведете ключови думи за ВашиÑÑ‚ файл Ñ Ð˜Ð·Ð¾Ð±Ñ€Ð°Ð¶ÐµÐ½Ð¸e в полето "Ключови думи".
ИзиÑкваниÑта за въвеждане на Ð¸Ð½Ñ„Ð¾Ñ€Ð¼Ð°Ñ†Ð¸Ñ Ð² тези полета може да намерите тук.
|
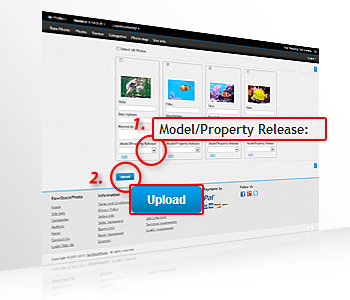
1. Изберете Model или Property Release от падащото меню "Model/Property Release".
2. За да завършите процеÑа на Публикуване в Сайта на избраните от Ð’Ð°Ñ Ñ„Ð°Ð¹Ð»Ð¾Ð²Ðµ Ñ Ð˜Ð·Ð¾Ð±Ñ€Ð°Ð¶ÐµÐ½Ð¸Ñ, преди да минете на Ñледващата Ñтраница Ñ Ñ„Ð°Ð¹Ð»Ð¾Ð²Ðµ (ако има такава), натиÑнете бутона "Качи".
|
|
|
| |
Преди да качите файл, Вие може предварително да добавите "Заглавие", "ОпиÑание" и "Ключови думи" към него чрез предпочитан от Ð’Ð°Ñ Ñофтуер. Когато тези метаданни Ñа добавени към файла, при качването му в RawStockPhoto Сайта, те автоматично Ñе разпознават от нашата ÑиÑтема. По този начин Вие може и да не попълвате горните три полета! Сайтът използва IPTC Ñтандарт за метаданните във файловете. |
| |
Ðко за ВашиÑÑ‚ файл Ñ Ð˜Ð·Ð¾Ð±Ñ€Ð°Ð¶ÐµÐ½Ð¸e Ñе изиÑква Model или Property Release, в падащото меню "Model/Property Release" Ñ‚Ñ€Ñбва да изберете файла на Release, който предварително Ñте качили от ÑÐµÐºÑ†Ð¸Ñ "Моите Качени", "Model/Property Release". Ðко нÑмате качен Model или Property Release предварително, може да направите това като кликнете на "РедакциÑ" под полето "Model/Property Release". Вижте как тук. |
|
3. РЕДÐКЦИЯ ÐРКÐЧЕÐИТЕ ИЗОБРÐЖЕÐИЯ
|
|
След като завърши процеÑа на качване и Сайтът автоматично Ви Ð¿Ñ€ÐµÑ…Ð²ÑŠÑ€Ð»Ñ Ð² ÑекциÑта "Моите Публикации", "Изображение", таблица "Ð’Ñички", Вие имате две възможноÑти за Ñ€ÐµÐ´Ð°ÐºÑ†Ð¸Ñ Ð½Ð° Вашите файлове Ñ Ð˜Ð·Ð¾Ð±Ñ€Ð°Ð¶ÐµÐ½Ð¸Ñ:
1. Ð ÐµÐ´Ð°ÐºÑ†Ð¸Ñ Ð¿Ð¾ единично на вÑеки файл
2. Групува Ð ÐµÐ´Ð°ÐºÑ†Ð¸Ñ Ð½Ð° нÑколко файла
|
|
1. Ð ÐµÐ´Ð°ÐºÑ†Ð¸Ñ Ð¿Ð¾ единично на вÑеки файл
|
 |
 |
|
Идете в полето "РедакциÑ" на един от качените от Ð’Ð°Ñ Ñ„Ð°Ð¹Ð»Ð¾Ð²Ðµ Ñ Ð˜Ð·Ð¾Ð±Ñ€Ð°Ð¶ÐµÐ½Ð¸Ñ. Тук:
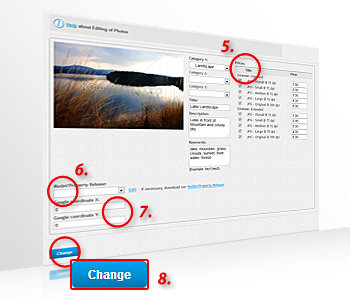
1. задължително Ñ‚Ñ€Ñбва да изберете поне една от трите Продуктови Категории за ВашиÑÑ‚ файл Ñ Ð˜Ð·Ð¾Ð±Ñ€Ð°Ð¶ÐµÐ½Ð¸e.
2. задължително Ñ‚Ñ€Ñбва да въведете име на ВашиÑÑ‚ файл Ñ Ð˜Ð·Ð¾Ð±Ñ€Ð°Ð¶ÐµÐ½Ð¸e в полето "Заглавие".
3. задължително Ñ‚Ñ€Ñбва да въведете опиÑание на ВашиÑÑ‚ файл Ñ Ð˜Ð·Ð¾Ð±Ñ€Ð°Ð¶ÐµÐ½Ð¸e в полето "ОпиÑание".
4. задължително Ñ‚Ñ€Ñбва да въведете ключови думи за ВашиÑÑ‚ файл Ñ Ð˜Ð·Ð¾Ð±Ñ€Ð°Ð¶ÐµÐ½Ð¸e в полето "Ключови думи".
ИзиÑкваниÑта за въвеждане на Ð¸Ð½Ñ„Ð¾Ñ€Ð¼Ð°Ñ†Ð¸Ñ Ð² тези полета може да намерите тук.
|
5. можете да редактирате информациÑта към таблицата "Цена".
6. можете да промените Model или Property Release от падащото меню "Model/Property Release".
7. можете да добавите Google Координати (по-желание), за да покажете мÑÑтото където Ñте направили каченото от Ð’Ð°Ñ Ð˜Ð·Ð¾Ð±Ñ€Ð°Ð¶ÐµÐ½Ð¸e.
8. за да завършите редакциÑта на ВашиÑÑ‚ файл Ñ Ð˜Ð·Ð¾Ð±Ñ€Ð°Ð¶ÐµÐ½Ð¸e натиÑнете бутона "ПромÑна".
|
|
|
| |
Преди да качите файл, Вие може предварително да добавите "Заглавие", "ОпиÑание" и "Ключови думи" към него чрез предпочитан от Ð’Ð°Ñ Ñофтуер. Когато тези метаданни Ñа добавени към файла, при качването му в RawStockPhoto Сайта, те автоматично Ñе разпознават от нашата ÑиÑтема. По този начин Вие може и да не попълвате горните три полета! Сайтът използва IPTC Ñтандарт за метаданните във файловете. |
| |
Важно!
• Ð’ таблицата "Цена" по подразбиране вÑички чекбокÑове Ñа маркирани.
• Ðко решите да маркирате Ñамо тези чекбокÑове в таблицата "Цена", които отговарÑÑ‚ на Вашето желание за продажба на файл Ñ Ð˜Ð·Ð¾Ð±Ñ€Ð°Ð¶ÐµÐ½Ð¸e Ñпоред размера и вида лиценз, имайте в предвид, че можете единÑтвено да изключите нÑкои от чекбокÑовете, като при поÑледваща Ñ€ÐµÐ´Ð°ÐºÑ†Ð¸Ñ Ð½Ñма да имате възможноÑÑ‚ да ги включите отново.
• Ðе може да добавÑÑ‚Ð
| |
 English
 Bulgarian
 German
 Russian
 Spanish